DIY Photo Booth
Photograph your next Event!

Don’t you LOVE it when you go somewhere and there’s a photo booth! All of the props that fill you with joy, and being able to capture memories with your friends and family!
But then… you realize how expensive renting a photo booth can be!
Now it’s time to get crafty and creative and build your own photo booth!
Creating your own mirror photo booth will be cheaper than renting or buying on pre-made. Also, you will get to keep it forever, and style it however you would like!
Step 1: Build Your Frame
The frame will hold the display you are using, an IR touch, and the glass.
You will want the overall size to be larger than the display, including the glass.
For example, we made a photo booth using an iPad. The overall size was matched the size of the IR Touch we used. We used a 32" IR Touch. This allowed plenty of room to see both your reflection and the screen on the iPad.
We used a shadowbox frame that was built to our custom size. The frame needs to be built to hold the IR Touch in place.
Step 2: IR Touch
Once you have your frame built you can place in the IR Touch. Even if the device you are already using is touch screen (like an iPad) you will still need an IR Touch.
The IR Touch will turn any device into a touch screen. The IR Touch is placed in before the glass because the glass will act as a giant screen.
The glass is why you need the IR Touch. You cannot tap and play with the iPad through the glass.
Step 3: Glass
The right type of glass is essential. We used the Smart Mirror glass because its physical properties connected well with the IR Touch properties.
The Smart Mirror glass is both transparent and reflective. You can see the iPad clearly through the glass!
Whatever part of the glass you are not using for the iPad, cameras, display, etc. you can black out with black paint or vinyl.
Blacking out the back of the excess glass is what will help you create the strong reflection you want for your photo booth!
The size of the glass will need to be the same size as the IR Repeater. It will be laying against it inside the frame.
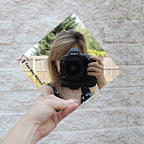
The glass does have a slightly grey tint, so if you are using a separate camera you will need to either cut a hole through he glass or place it on top.
We cut a hole in the glass right above the iPad display to place our DSLR Camera lens through it.
Even though the iPad has a camera, we wanted the best quality to match our photo booth build!
There you have it! Your own photo booth! you can use any photo booth app you would like for the software.